No Equipment Back Exercises You Can Do at Home
Discover effective no equipment back exercises you can do at home. Strengthen your back and improve posture with our easy-to-follow routines.
FITNESS
2/17/20254 min read
No Equipment Back Exercises You Can Do at Home
Have you ever felt that nagging stiffness in your back after hours of sitting, or maybe you've just noticed your posture isn't quite what it used to be? You’re not alone. Many of us neglect the muscles in our back until we’re faced with discomfort. Strengthening these muscles isn't just for those aiming for a sculpted look—it’s essential for good posture, functional fitness, and overall well-being.
The best part? You don’t need fancy equipment or a gym membership to work on your back. In this guide, I’ll walk you through five super-effective back exercises that you can do from the comfort of your living room. All you need is a little floor space, some time, and a lot of enthusiasm. Let’s get started!
1. Reverse Snow Angels
Reverse snow angels are fantastic for strengthening your mid-back muscles and shoulders. If you’ve ever wanted better posture or relief from upper back tension, this one’s for you.
How to Do It:
Lie face down on the floor with your arms extended straight in front of you, palms facing down.
Keep your legs straight and forehead gently resting on the ground (or a small towel).
Slowly sweep your arms out to the sides in a wide arc, as if creating a snow angel, and bring them toward your hips.
Reverse the motion to return to the starting position.
Perform 2-3 sets of 10-12 reps.
Tips for Proper Form:
Keep your arms slightly off the ground during the entire movement.
Avoid shrugging your shoulders; focus on squeezing your shoulder blades together.
Move slowly and with control.
Modifications:
Beginner: Reduce the range of motion if you feel strain. Move your arms only halfway before returning to the start.
Advanced: Hold lightweight objects like water bottles for added resistance.
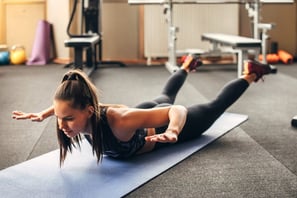
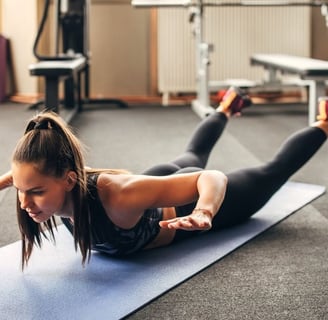
2. Superman Hold
Channel your inner superhero with the Superman hold. This simple yet challenging exercise targets your lower back, glutes, and even your hamstrings.
How to Do It:
Lie face down with your arms extended in front of you and your legs straight.
Simultaneously lift your arms, chest, and legs off the ground, creating a slight arch in your back.
Hold this position for 10-30 seconds.
Lower back down with control and repeat for 3-5 reps.
Tips for Proper Form:
Avoid over-arching your back; aim for a controlled, natural lift.
Keep your neck neutral—don’t tilt your head back.
Engage your glutes and core for stability.
Modifications:
Beginner: Lift just your arms or legs, not both, until you build strength.
Advanced: Add flutter kicks or arm movements during the hold.
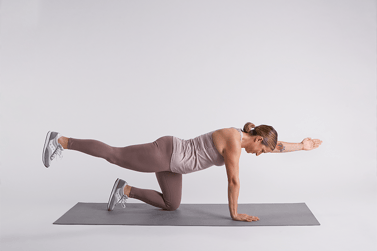
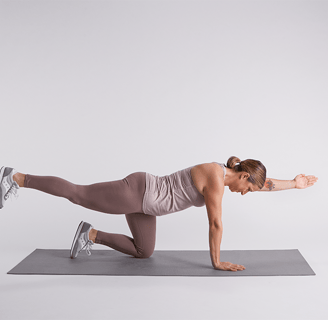
3. Bird Dog
Bird Dog is a balance-focused exercise that strengthens your lower back, core, and stabilizing muscles.
How to Do It:
Start in an all-fours position (hands under shoulders, knees under hips).
Extend your right arm and left leg simultaneously until they are parallel to the ground.
Hold for a moment, then return to the starting position.
Switch sides, extending your left arm and right leg.
Alternate for 2-3 sets of 12-16 reps.
Tips for Proper Form:
Keep your hips level—don’t let one side dip.
Move slowly and with intention, keeping your core engaged.
Imagine a straight line from your fingertips to your toes.
Modifications:
Beginner: Practice just lifting one limb at a time to build coordination.
Advanced: Add a crunch by bringing your elbow to your knee before extending again.
4. T-Y-I Raises
This one’s a mouthful, but don’t let the name intimidate you! T-Y-I raises are superb for targeting your upper back and improving shoulder stability.
How to Do It:
Lie face down on the floor with your arms out to the sides in a “T” shape.
Lift your arms and chest slightly off the ground, squeezing your shoulder blades together. Lower down.
Next, move your arms into a “Y” position and repeat the lift and lower.
Finally, position your arms into an “I” (straight overhead) and repeat.
Complete the T, Y, and I sequence for 10-12 reps total, and repeat for 2-3 sets.
Tips for Proper Form:
Keep your movements controlled and precise.
Don’t lift your legs; focus on your upper body.
Keep your gaze down to avoid neck strain.
Modifications:
Beginner: Perform each letter separately, pausing to rest between positions.
Advanced: Hold each letter pose for 2-3 seconds before lowering.
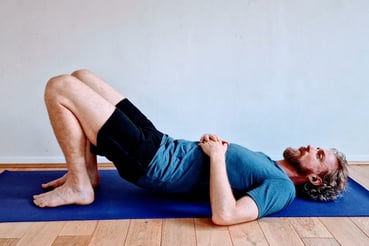
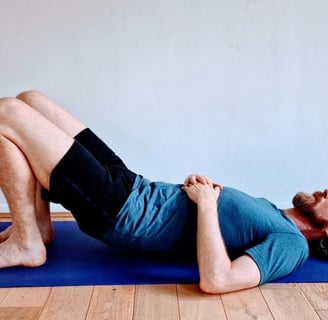
5. Bridge Pose
While often associated with glutes, bridges also activate the muscles in your lower back and hips.
How to Do It:
Lie on your back with your knees bent, feet flat on the floor, and arms at your sides.
Press through your heels to lift your hips off the ground until your body forms a straight line from shoulders to knees.
Squeeze your glutes at the top, then lower back down slowly.
Perform 2-3 sets of 10-15 reps.
Tips for Proper Form:
Avoid arching your lower back; focus on lifting through your hips.
Keep your knees aligned with your feet.
Engage your core throughout the movement.
Modifications:
Beginner: Hold the top position for just a few seconds before lowering.
Advanced: Perform single-leg bridges, extending one leg straight as you lift.
Additional Tips for Success
Warm-Up First: Spend 5-10 minutes warming up your body with light stretches or dynamic movements to prevent injury.
Focus on Form: Quality over quantity is key. Pay attention to your alignment and move with control.
Listen to Your Body: If an exercise feels uncomfortable or painful, stop and reassess your form. Modifications are there for a reason—use them!
Stay Consistent: Aim to incorporate these exercises into your routine 2-3 times a week for the best results.
Add Progressions: Over time, challenge yourself by increasing reps, holding positions longer, or combining exercises for a full back-focused workout.
Closing Thoughts
Taking care of your back doesn’t have to mean fancy equipment or gym memberships. With these simple exercises, you can strengthen your back, improve your posture, and feel more confident in your movements—all from the comfort of home. Remember to take it at your own pace, celebrate your progress, and, most importantly, enjoy the process. Your back (and your future self) will thank you!